Had a real problem (for us, at least). Our grocery and shopping lists stopped pushing to our phones when we walked in a store. Its goofy, but when technology works like its supposed to you hardly notice it and it becomes a part of life. But when it stops working…geez. Bigger problem…the same service geofenced our alarm system for the house. Again, no big deal to just punch in a code on the panel, but it was annoying when we were used to just opening the door and going about our day.
Enter the ever-changing world of corporate technology. The problem was, upon digging, that Life360 had decided to lock down its app to home automation integrations, leaving the relatively small, but not insignificant population of those users in the lurch for a decent geolocation provider for automations. Annoying, but again, not totally unexpected or new when in the world of DIY.
Solution: OwnTracks. Not going to lie, its not a setup for the novice. If you have no need for pulling in automations or driving custom geofencing alerts, stick with Life360. That being said, if you want to go down the rabbit hole, you get:
- A wholly owned location server that resides with you (which means you control your data)
- Friendly, open-source code (i.e., code is visible to all, which in a way increases both data security and privacy)
- A freely accessible API for driving any automation you wish
Why OwnTracks
In short, data privacy and flexibility. Most of my automations are driven by presence and location; with Life360 becoming unusable, it broke most of my “convenience” automations. As examples:
- When we arrived at grocery stores or other retailers, any of those “random” items we needed but almost never remembered to pick up at that store would push to our mobile devices through an Alexa integration in Node-RED
- Arming/disarming the house was based on geofencing; almost all smart devices (especially thermostats) will geofence. I found it annoying to geofence in multiple apps, so again through Node-RED I tied all of those geofenced items together through a location service
As an added bonus, OwnTracks is open source, which means the code is free, open to all, and updated frequently. If I wanted to updated a part of the program myself to better suit my needs, if I have the coding ability I can do that. Try doing that to Windows, iOS, or any other large corporate application. In my experience, open source apps are also longer lived and not subject to stockholder or CEO whims; if an owner of a popular OS app can’t maintain it, its not uncommon for other members of the community to continue support and maintenance.
What you get, and what you need
Okay, lets dig into what you’ll actually get out of this. First up, you’ll get a mobile location app, just like Life360, that can display friends and family, navigate to those friends, and tracks all of your locations. You’ll also get a desktop map and tracker that is accessible through any browser.
What you won’t have is all of those annoying promotions or ads. However, you’ll also lose the added “bonuses” that a polished app like Life360 has (i.e., crash detection, easy friend adds, etc.). You’ll also need to fork over a little cash up front:
- You’ll need an always-on machine (a Raspberry Pi or mini-PC) running some newer flavor of Linux
- A domain name pointing to your public IP address
Seriously, the most expensive thing in this project is the hardware, and it’s a one-off.
How It Works
Essentially, we’re setting up a few different items. An always-on server running MQTT (or Mosquitto), which in broad terms is a database multiple users can subsribe to and receive events. The MQTT broker stores events in a database for each user, and users subscribe to database changes. A Nginx web server is installed for access through the web to the Frontend tools, and a Recorder app is installed to view location information on the Frontend. During setup you’ll add any friends/family/users and also setup a TLS certificate to encrypt traffic to the MQTT server.
Pre-Install
Prior to the installation of OT, you’ll need to do the following:
- Setup your server (again, in my case a RPi running Bookworm)
- Purchase a domain name (example.com) and create appropriate DNS records pointing to your server
- Open up the following ports on your router and port forward them to the OT server: 80, 443, and 8883 (MQTT)
Again, if any of that is unfamiliar you may want to revisit this at a later date, but if you’re still with me…let’s get going. All of this can be found at the OwnTracks site in their install booklet here. You can read it to finish the install from there and glean some info on how MQTT works, or you can keep going for my summarized version here.
OT Install
OT will be installed using their quick setup. I do recommend that if you are using a registrar that proxies your IP address to turn that off temporarily; I’ve not had any issues with Cloudflare proxying my IP, but it can sometimes cause issues with LetsEncrypt issuing TLS certificates.
Grab the installer
Get started by grabbing the installer from Github. You’ll install git (if not already installed).
$ sudo apt install -y git
$ git clone --depth=1 https://github.com/owntracks/quicksetup
Change into the quicksetup folder:
$ cd quicksetup
Now, if you want to you can read some of the other files in here; notably the “Notes” and “Readme” files contain some information (especially about passwords) that are not contained in the booklet. Otherwise, let’s move on.
Copy and create the configuration file
The installer works off a configuration file that passes basic parameters. We’re going to copy the example file and rename it, and then fill it out with the required information to continue prior to running the install script.
$ cp configuration.yaml.example configuration.yaml
$ nano configuration.yaml
Let’s look at the config file:
# configuration for OwnTracks backend quicksetup

# Specify your DNS domain, the name by which this OwnTracks
# backend will be reacheable. We use this to enroll in
# Let's Encrypt certificates for this domain on your behalf
#
# Make sure you replace 'owntracks.example.net' by the correct
# name for your installation.

dns_domain: "owntracks.example.net"

# Specify your email address. We use this when signing up on your
# behalf to Let's Encrypt and for nothing else. If you don't
# configure an email address, we set up without SSL/TLS

email: "you@example.net"

# We strongly recommend you sign up for the free reverse geo
# service at OpenCage. It costs you nothing, and they provide
# you with an API key you add here.
#

# opencage_apikey: "xxxxxxxxxxxxxxxxxxxxxxxxxxxxxxxx"

# Configure yourself and a list of friends who will be using
# this backend. Each friend will use their "username" to login
# to the site and to the apps. Their device is a "devicename"
# (this can be any suitable name, but we recommend you keep it
# generic so as to not have to change this if you move to a
# distinct device; i.e. "myphone" instead of "siemens-e2"),
# and their "tid" is a tracker- id which is used to label users
# on the map. A tid is a string of length two characters.
# Optionally a "password" may be set below; if omitted, passwords
# are generated and stored at /usr/local/owntracks/userdata/*.pass
# on this system.
#

friends:
- { tid: "JJ", username: "jane", devicename: "nokia" }
- { tid: "AA", username: "ernesto", devicename: "s10" }
- { tid: "BB", username: "sue", devicename: "myphone" }

# ---- advanced options below

# Path to an optional Lua script the Recorder should load at
# startup.

# lua_script: "/path/to/example.lua"
Few things to call out:
- The DNS domain is the domain name you setup with your registrar
- The email will be used for LetsEncrypt to obtain a certificate and for renewal alerts
- OpenCage is a service to provide a friendly address (or reverse geocode) for a set of given coordinates. It’s free, so set it up here to get the API.
If you know all the users you want to set up now, go ahead and do it. Importantly, go ahead and set up YOUR account here as the first “tid”. The TID should be no more the 2 characters (this shows in the mobile app). You can add more later, but it’s easier to do now if you know who you’re adding already.
Run the installer
Lastly (at least for now), run the installer program (Ansible). Running this script takes info from the config file and installs and configures the services appropriately:
$ sudo ./bootstrap.sh
./bootstrap.shcommand again. This will add the users, and has no effect on the Recorder.
If the installer is successful, it will install MQTT, Frontend for web access, TLS certificates and renewal scripts, and the Recorder. If you see any red lines in the CLI, something went wrong and you’ll need to check the logs.
Set up mobile apps
Assuming your install was successful you’ll need to set up the mobile apps. This part is a little more complicated than just signing in and moving along, but not that much more. First up, search for and install OwnTracks from your app store. Now, we’ve got to configure the app.
The easiest way to do this is download the app on the device, and in the mobile browser visit your instance that you just set up (at http://owntracks.example.net, replacing with your actual domain). You’ll be prompted for a username and password (the same username you created in the setup step).
If you didn’t set a static password, you’ll need to find it. During setup the installer created device install files as well as passwords for each user. The easiest way to get your passwords is to access vile a file browser in a program such as Webmin. In either case (CLI or management app), go to the user directory at /usr/local/owntraacks/userdata/youruser.pass. Accessing this file via the editor will display your password.
Log into your instance on your mobile device and look for the OTRC file link. You’ll want to download this file and note the download location.
Go into the mobile app now and follow the prompts to set up your device. If all goes well, you should see the live map with your device location and badge.
Repeat the process for any other users in your household; as they add their devices you’ll start seeing them populate on your friends list in the app.
Mobile app notes
The mobile apps require that your device permissions are set correctly. Regardless of OS, you need to make sure that your apps have access to location all the time as well as unrestricted usage (i.e., the app shouldn’t be put to sleep). Android in particular will give location access while using the app but you will need to go into the device app settings and permissions to give more specific location access all the time.
You can check that the app has all necessary permissions, as well as end state connectivity, from the status tab in the app menu.
Regions (or tagged locations)
Think of regions as geofence areas. In Life360 for example, when you checked into a location it created a waypoint with that location name (if available). In my case, because I have automations driven by tagged locations, losing Life360 was a problem. Enter regions. If you know the exact latitude and longitude of the location you are adding, you can set it up without being there. Alternatively, though, and what I have done, is just recreate my tags as I go. Importantly, adding regions should include a radius to determine entry/exit; you want the area to be responsive to your movements, but not so large or small that movement doesn’t get picked up. I’ve found 50-100 meters works pretty well.
Post install notes
I found the install to be relatively straightforward, and the software functions as intended. As I said before, though, its not going to be as polished as some of the other location apps. However, you own your data, where it goes, who sees it, and what is done with it. I’ve found, too, that with a little adjustment I can run the same automations with OwnTracks that were previously driven by Life360. As an example:

This is a flow that takes any of the items we’ve added to one of our Alexa lists and pushes those items to our phones via Pushover when we enter a tagged location.
With OwnTracks, the “simple” fix (since Life360 and the previous integration I used actually pushed those locations out in a very friendly format) is to subscribe to the MQTT server in Node-RED. Specifically, we want to subscribe to the owntracks/+/+/event topic and the “entry” payload. Alternatively, the sequence I have for home geofencing subscribes to the same topic, but listens for either the “entry” or “leave” payload, depending on what sequence I need to fire.
Just one example; because it is open source and the code is visible, the sky is the limit if you have programing aptitude, and the team has already built in several API endpoints. Plus, with a MQTT server you already have a ton of integration options.
Web access and TLS
You can always access your server and the live map through a web browser; but, and I found this out the hard way, the user interface is not designed to work over HTTPS. I may be overboard, but if I am accessing something through a browser I prefer it to be encrypted and secured; same with location info. Now, if you follow the documentation, traffic between your mobile device(s) and the MQTT server will be encrypted, but the same TLS certificate does not apply to the web interface.
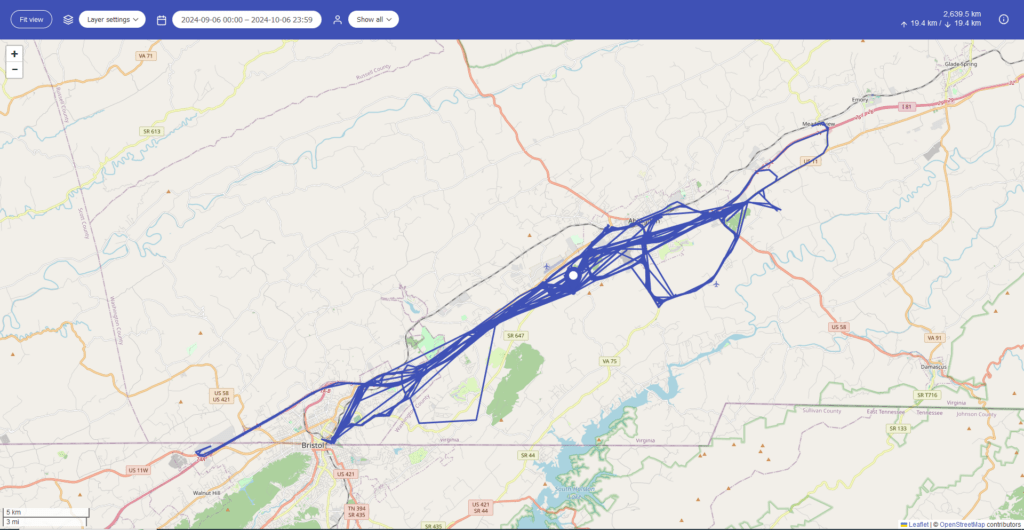
So what does that mean? Functionally, not much. Even if you do, like I did, and set up the server behind a reverse proxy with HTTPS enabled, it only affects the web interface, not the actually data publishing to the MQTT server. Moreover, it only affects the live map. To illustrate:

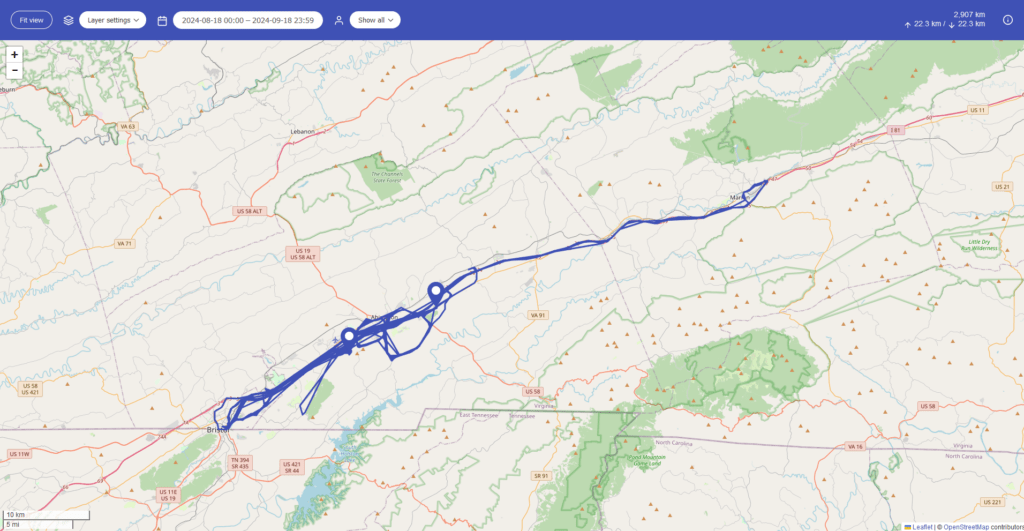
The empty globe is the live map with HTTPS enabled, versus the Frontend map with HTTPS enabled. On the other hand:
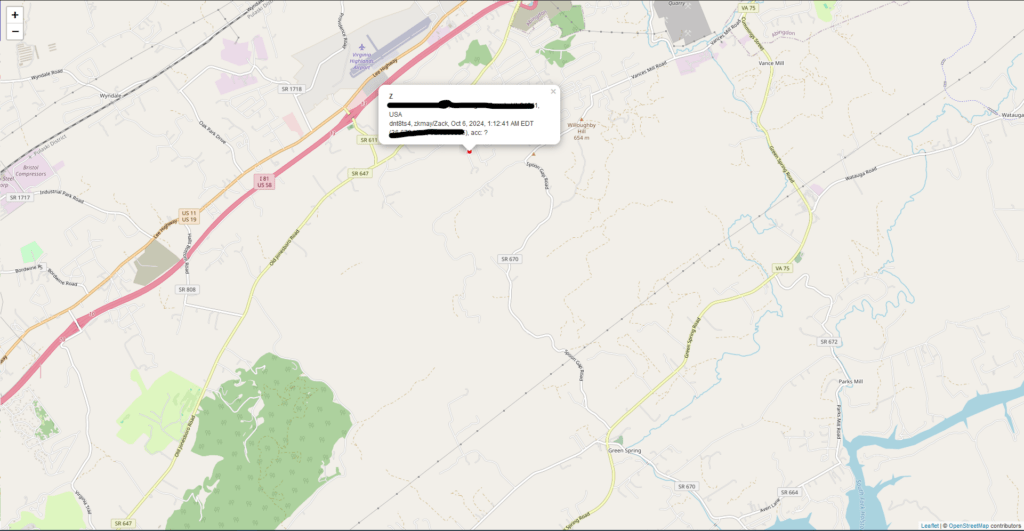
Accessing the server over the web via IP address behind a reverse proxy gets the functioning live map. What’s the difference? The Live Map simply shows cards with current locations of you and your friends. The Frontend view shows the history of where everybody has been, and you can filter it to each user.
In other words, personally, I’m not upset that putting the server behind HTTPS encrypts traffic at the cost of the live map, since I can still use (in my own opinion) the more functional Frontend. But, that’s personal preference; again since this server is exposed to the web…I prefer it to have TLS encryption.
No responses yet