
Need to display the status of your Minecraft server? It took some work, but between ChatGPT, experience over the last few years, and the base code from CodePen, I’ve came up with this HTML code that will display the status of a Minecraft server along with players, max players, online players, and server version.
Base Widget
The widget will draw on the API from mcsrvstat.us. You’ll need to know of course your server address and port number, but the script will take the data from the API call and display it as a widget that will refresh on page load.
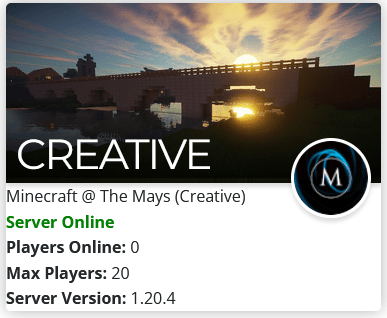
The widget banner will pull from hosted media, so you will need a URL for the banner background image. The logo will pull directly from the server properties file.
In the event the server is offline or unreachable, the widget will show a status of “Server Offline”.
First up, you’ll need to create a PHP file on your server to call the API. Name this file, as an example, server_info_port#.php, and place the following in the file, making sure to include your server address and port:
<?php
header("Content-Type: application/json");

$url = "https://api.mcsrvstat.us/2/yourserveraddress";

// Initialize cURL
$ch = curl_init();
curl_setopt($ch, CURLOPT_URL, $url);
curl_setopt($ch, CURLOPT_RETURNTRANSFER, true);
curl_setopt($ch, CURLOPT_HEADER, false);
curl_setopt($ch, CURLOPT_HTTPHEADER, [
    'User-Agent: MyServerStatusScript/1.0' // Set a User-Agent header
]);

$response = curl_exec($ch);
$httpCode = curl_getinfo($ch, CURLINFO_HTTP_CODE);
curl_close($ch);

// Check HTTP response status
if ($httpCode === 200) {
    echo $response; // Return the API response
} else {
    echo json_encode(['error' => 'Unable to fetch server status', 'code' => $httpCode]);
}
?>
Note the location of that file and head over to the web page you would like to display your widget. I use Elementor, so I’ll insert an HTML block for the code, but if you use WordPress with the standard block editor you’ll use a custom HTML block. In that section, place the following code:
<!-- Widget 1 - Creative Mode -->
<div class="card">
  <div class="icon" id="iconContainer1"><img src="https://pbs.twimg.com/profile_images/808180587605331969/u-CULTwl_400x400.jpg" id="favicon1"></div>
  <div class="header">
    <div class="image"> <img src="path_to_your_header_image" alt="" /> </div>
    <h2>Creative</h2>
  </div>
  <div id="rest1">Loading ...</div>
</div>

<!-- Load jQuery for Widget 1 -->
<script>
  function fetchServerInfo1() {
    var url = "/server_info_25565.php";
    // Use fetch instead of jQuery's getJSON for compatibility with CORS
    fetch(url)
      .then(response => response.json())
      .then(r => {
        if (r.online === false) {
          document.getElementById("rest1").innerHTML = "<b style='color: red'>Server Offline</b>";
          // Hide the logo if the server is offline
          document.getElementById("iconContainer1").style.display = 'none';
        } else {
          var serverStatus = "<b style='color: green'>Server Online</b>";
          var playerList = "<br>" + serverStatus;

        if (r.players.online !== undefined) {
            playerList += "<br><b>Players Online:</b> " + r.players.online;
            playerList += "<br><b>Max Players:</b> " + r.players.max;
  // Check if there's a player list to display
            if (r.players.list !== undefined && Array.isArray(r.players.list) && r.players.list.length > 0) {
                r.players.list.forEach(function (player) {
                    playerList += "<br>" + player;
                });
            }
        } else {
            playerList += "<br><b>Players Online:</b> 0";
            playerList += "<br><b>Max Players:</b> " + r.players.max;
        }
        if (r.version) {
            playerList += "<br><b>Server Version:</b> " + r.version;
        }
          document.getElementById("rest1").innerHTML =
            r.motd.html + playerList;
          document.getElementById("favicon1").src = r.icon;
        }
      })
      .catch(error => {
        console.error('Error fetching server info:', error);
      });
  }

  // Wait for the document to load, then run the script for Widget 1
  document.addEventListener("DOMContentLoaded", function() {
    fetchServerInfo1();
  });
</script>
Note the three areas of text in red. You will need to define the URL for your header banner, the title of your header, and the path to the server_info file you just created. We are calling the API server-side to avoid cross-origin requests, which, as I found out the hard way, are blocked by most browsers.
Now, publish your changes and on your page you should see the server status widget successfully.
Creating a Server Icon
If your server does not have an icon displayed, you can easily create one. Pick, or create, an icon and save it as a PNG file. Upload this file to your server directory and name it “server-icon.png”. Restart your server and refresh the widget; the icon should now display in the status widget.
Updated 1.9.25
Author: Zack
Site owner, techy guy, cranky dude (sometimes), jack of all trades.
No responses yet